Start with the crop, then measure the container
A volume calculation can tell you how much mix occupies a shape. It cannot tell you whether that shape gives a plant enough roots, drainage, or stability. Make the crop decision first. Penn State Extension's 2026 container vegetable guide, for example, recommends at least a 20-inch-wide pot for a tomato and says all vegetable containers should be at least as tall as they are wide. University of Illinois Extension lists different minimum container sizes for tomatoes, peppers, root crops, greens, and herbs. These are crop-fit checks, not interchangeable bag-volume promises.
Once the container fits the plant, inspect the drainage. A potting-mix estimate is wasted if water has nowhere to leave. Illinois Extension calls a bottom drainage hole critical and warns that gravel under the mix does not improve drainage. The water can remain perched in the media above the gravel. Keep drainage holes open, use a detachable saucer where runoff must be caught, and empty collected water.
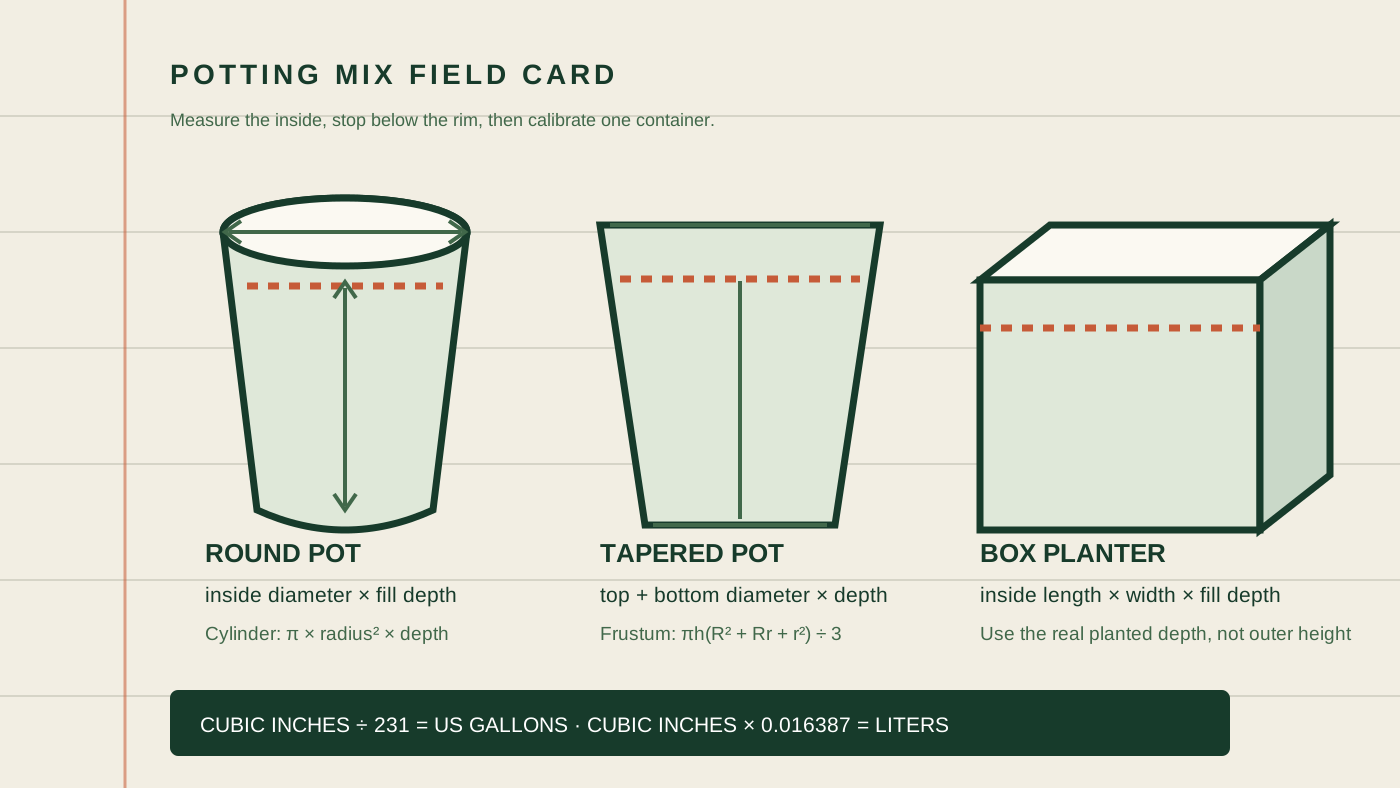
Now define the fill line. Illinois Extension advises leaving roughly one inch between the media surface and the rim so irrigation water does not immediately spill over. Large pots may need a different practical headspace, but the principle is the same: measure to the intended soil surface, not to the highest decorative edge.
Make a five-line container record
Use the same unit for every dimension. Inches are convenient when bag volume will be converted to US gallons or quarts; centimeters are convenient for liters. Record these five items before calculating:
- Inside top dimensions. Measure below a thick rim, not across the outer lip.
- Inside bottom dimensions. Record these when the sides taper. A sharply tapered pot holds less than a cylinder with the same top diameter.
- Planned fill depth. Measure from the inside bottom or supported false floor to the soil line.
- Fixed volume displacements. Note a reservoir, insert, permanent irrigation column, or large existing root ball.
- Container count. Group only containers with the same inside shape and fill depth.
Flexible fabric pots deserve a measured trial. Their nominal gallon label is useful for comparison within a product line, but the filled shape changes with the mix, seams, and support. Measure the filled diameter and depth, or calibrate one bag-to-pot fill before multiplying across the group.
Calculate three common shapes
Round pot with nearly straight sides
Measure the inside diameter at the soil line and divide it by two to get the radius. Multiply π × radius × radius × fill depth.
This estimate treats the pot as a cylinder. It is suitable when the sides are close to vertical. It will overstate the capacity of a pot that narrows substantially toward the base.
Tapered round pot
For a truncated cone, measure the inside top radius (R), inside bottom radius (r), and fill depth (h). Use π × h × (R² + Rr + r²) ÷ 3.
Window box or rectangular planter
Multiply inside length × inside width × fill depth. If the walls taper, calculate a conservative lower and upper bound using bottom and top dimensions, or split an irregular planter into simpler sections.
Use the conversion that matches the bag
| Starting volume | To get | Operation |
|---|---|---|
| Cubic inches | US gallons | Divide by 231 |
| Cubic inches | US quarts | Divide by 57.75 |
| Cubic inches | Liters | Multiply by 0.016387 |
| Cubic feet | US gallons | Multiply by 7.4805 |
| Liters | US gallons | Divide by 3.7854 |
Keep one extra decimal while calculating and round only at the end. Then divide the total project volume by the volume printed on one bag. Bag labels describe packaged volume. The final depth in a pot can vary with moisture, fluffing, settling, root balls, and how firmly a person packs the media, so the arithmetic should lead to a physical check rather than an exact shopping promise.
Calibrate one container before multiplying
For several identical pots, fill one first. Lightly moisten and fluff bagged media if its instructions call for it; Illinois Extension notes that bagged media are easier to use when slightly moist. Add the mix without forcefully compacting it, settle it as the product directs, and leave the planned watering headspace. Record how much of the bag the pot actually used.
Then adjust the project estimate:
- Mark the bag before opening. Record its labeled volume and the container ID.
- Prepare the mix consistently. Follow the manufacturer's wetting and handling instructions.
- Fill to the measured line. Do not press hard to make the calculated number fit.
- Add the plant or a measured stand-in. An established root ball displaces mix; a seed-sown empty pot does not.
- Record actual use. Multiply that amount by the remaining identical containers, then decide whether a modest project buffer is warranted for spills and settling.
There is no honest universal buffer percentage. Fine and coarse mixes settle differently, compressed bales expand differently, and root balls displace different amounts. One calibrated container is more useful than a confident percentage copied across unrelated products.
Choose a mix by root-zone behavior
Volume is only one specification. Illinois Extension says container media must stay well aerated and well drained while retaining enough moisture for plant growth. Straight garden soil is usually too dense in a container and may bring weed seeds or pathogens. Penn State likewise recommends a soilless mix for container vegetables because its components create drainage while holding water and nutrients.
Read the ingredient label and match the structure to the crop and conditions. Bark, coir, peat, perlite, and vermiculite do different jobs in different proportions. A hot, windy balcony, a shaded indoor shelf, and a self-watering reservoir do not impose the same drying pattern. Pot material matters too: Illinois Extension notes that fabric, clay, and unglazed ceramic tend to dry faster than plastic or glazed pots.
Do not correct a mix problem by buying extra volume. If a container stays waterlogged, check drainage, media structure, pot size, irrigation, and plant fit. If mix pulls away from the wall after drying, restore moisture gradually according to the product and crop guidance rather than packing fresh dry material into the gap.
Decide whether old mix belongs in the estimate
Reusing media can reduce waste, but its history matters. Illinois Extension says media from healthy containers can sometimes be reused, while media associated with major disease problems should not return to pots. Organic components also break down over time, reducing the drainage and aeration that made the mix suitable.
- Were the previous plants healthy and free of a serious pest or disease problem?
- Does the material still drain and spring back, or has it collapsed into a dense mass?
- Are salts, roots, weeds, or unknown amendments concentrated in it?
- Will the next crop have the same media and sanitation needs?
- Does local disease guidance allow the intended reuse or compost route?
Do not mix questionable old media into new bags merely to meet the calculated number. If it is unsuitable for containers but safe to handle, local Extension or municipal compost guidance can help identify an appropriate destination.
A purchase worksheet that avoids phantom precision
| Container group | Record | Decision |
|---|---|---|
| Round, straight | Inside diameter, fill depth, count | Use cylinder formula |
| Round, tapered | Top and bottom inside diameters, fill depth, count | Use frustum formula |
| Rectangular | Inside length, width, fill depth, count | Use box formula |
| Irregular or fabric | Filled dimensions or one-pot bag use | Calibrate before multiplying |
| Already planted | Root-ball dimensions and final soil line | Subtract displacement, then calibrate |
Write down the formula result, bag size, first-pot actual use, and final quantity separately. That preserves the evidence behind the purchase. Next season you can update the record with settling, top-up volume, crop performance, and whether the container was too wet, too dry, or appropriately sized.
Frequently asked questions
How do I calculate potting mix for a round pot?
For a straight-sided pot, measure the inside diameter and planned fill depth. Divide diameter by two, square the radius, multiply by π, then multiply by depth. Divide cubic inches by 231 for US gallons. Use the tapered-pot formula when the base is much narrower than the top.
Should I trust the advertised gallon size?
Use it as a comparison clue, then measure. A trade gallon, liquid gallon, and usable planted volume are not always the same. Inner walls, taper, rim shape, reservoir, and fill line all affect the amount of mix needed.
Can gravel reduce the amount of mix in a large pot?
Do not add gravel to improve drainage. Illinois Extension explains that it can leave a saturated layer perched in the media above it. For a very large decorative planter, use a purpose-designed insert only when it preserves the root depth, stability, drainage, and load needs of the chosen crop.
Do I need to buy extra mix?
Calculate first, then calibrate one container. Buy decisions should reflect actual bag volume, root-ball displacement, how the mix is prepared, expected settling, and the cost of a second trip. A universal percentage would imply more precision than the materials support.
Sources checked
- Penn State Extension — Container Vegetable Gardening: Four Keys to Success, updated March 30, 2026.
- University of Illinois Extension — How to Grow Fruits, Vegetables and Herbs in Containers.
- University of Illinois Extension — Soil: Container Gardens.
- University of Illinois Extension — Container Drainage Options.
- University of Illinois Extension — 6 Tips for Watering Container Gardens.
- Penn State Extension — Potting Media and Plant Propagation, updated January 14, 2025.
- University of Georgia Cooperative Extension — Gardening in Containers.
Research reviewed October 21, 2026. Crop needs, container structure, media labels, and local conditions should guide the final plan.