Use the right date for the job
Seed-starting charts often ask for a frost date as though every gardener has one fixed, certain day. The useful number is usually a local average last spring freeze: the historical average date after which a weather station no longer recorded a temperature at or below 32°F. NOAA's National Centers for Environmental Information publishes 1991–2020 climate normals and maps the average last spring freeze among its annual climate events. Search by a nearby station, ZIP code, city, county, or state, then record which station and normal you used.
Do not substitute a USDA Plant Hardiness Zone. The USDA map groups locations by their average annual extreme minimum winter temperature. That helps compare perennial cold hardiness. It does not tell you when spring freezes usually end, how quickly soil warms, or whether next Tuesday is safe for a tender transplant. Two places in the same hardiness zone can have different spring schedules because elevation, distance from water, urban heat, slope, and local air drainage differ.
Also distinguish frost from freeze. Surface frost can form under conditions that differ from the official air-temperature reading, while NOAA's climate-normal event uses a temperature threshold. Seed packets and Extension publications may use “last frost” as familiar shorthand. Write down the source and definition beside the date so the calendar does not pretend unlike measures are identical.
Build one row for every crop and variety
A generic vegetable calendar is useful for discovering what to investigate. It should not overrule the packet in your hand. Varieties differ in days to maturity, recommended weeks indoors, sensitivity to root disturbance, and whether indoor sowing is useful at all. University of Minnesota Extension advises following the packet's instructions for when and how to sow. If a packet is vague, use a current Extension crop guide for your region or ask the seed company for the variety's propagation instructions.
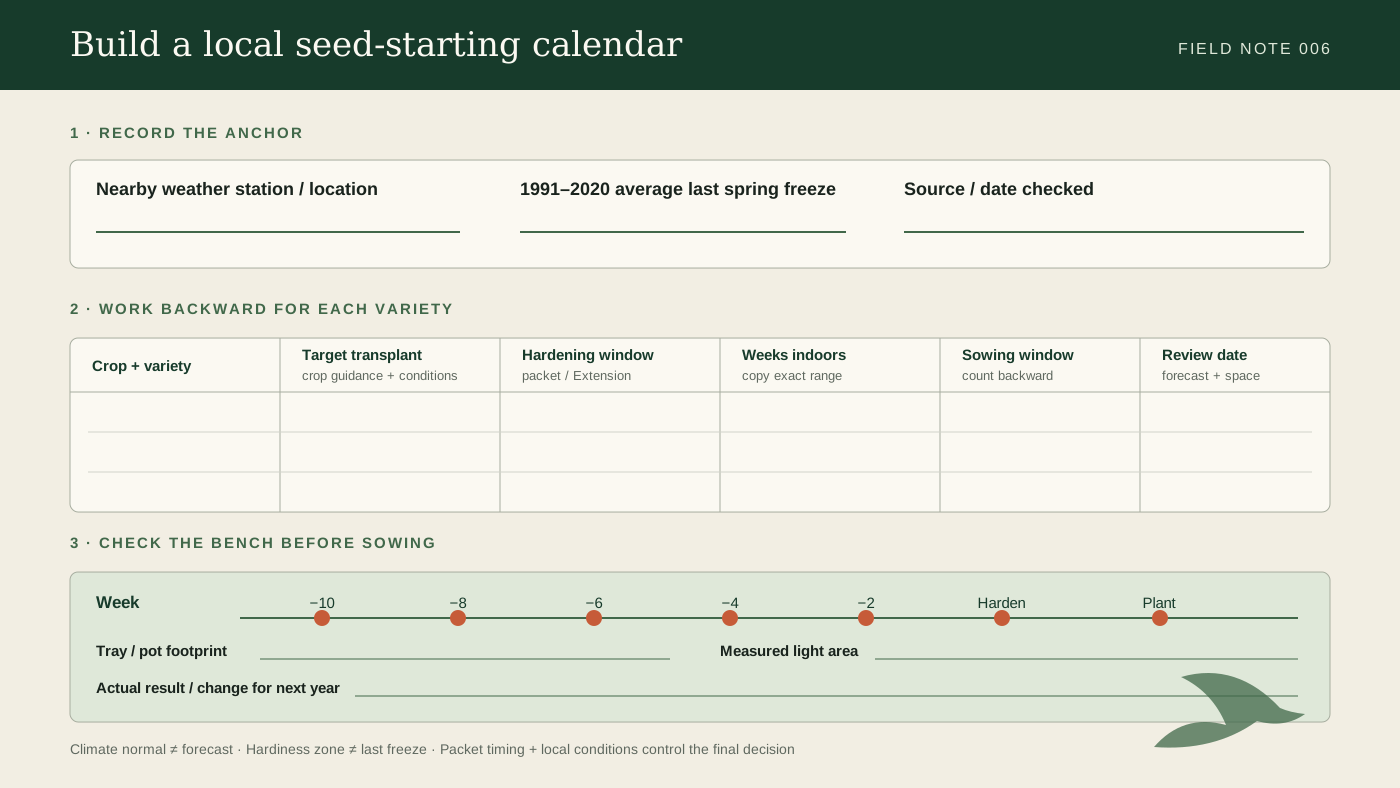
Make one row per crop and variety. Record the following before doing date arithmetic:
- Local climate anchor. Write the average last spring freeze date, source, station, and 30-year normal period.
- Outdoor target. Note whether the crop can go out before, near, or after that anchor, based on its specific guidance.
- Weeks indoors. Copy the packet's sowing-to-transplant range rather than relying on memory.
- Hardening period. Record the crop-specific transition guidance. Do not assume every seedling needs the same sequence.
- Germination and handling notes. Include temperature, light, stratification, transplant sensitivity, and direct-sow advice.
- Indoor footprint. Estimate the number and size of cells or pots at each stage, including any planned pot-up.
That final field prevents a paper calendar from exceeding the shelf. Thirty seedlings in small cells may fit at sowing and fail to fit after they need wider spacing or larger pots. The schedule should describe the space the plants occupy at their largest indoor stage, not only the seed tray on day one.
Choose a transplant target before subtracting
The average last freeze is not automatically the transplant date. A cold-tolerant crop may have regional guidance that allows earlier planting. A tender crop may need warm soil and settled nighttime temperatures well after the average. Wet soil, wind, a cold frame, an exposed balcony, or a low garden pocket can change the decision. Begin with the crop's published outdoor conditions, then place a provisional transplant target on the calendar.
Use a range when the packet gives a range. For example, if guidance says to start a crop six to eight weeks before transplanting, retain both ends. A two-week sowing window is more honest and useful than choosing an exact day without a reason. Put a review checkpoint near the beginning of that window. At the checkpoint, compare indoor space, local outlooks, soil readiness, and the health of any earlier sowings before committing the entire batch.
NOAA normals describe the recent climate record; they do not forecast the current year. As planting approaches, use the National Weather Service forecast and local Extension alerts for actual conditions. Delay tender plants when a damaging cold event is possible. A schedule is successful when it helps you make the decision, even if the weather makes you move the date.
Count backward in three passes
Use a calendar that supports week-by-week counting. Avoid multiplying “weeks” into vague month names. If the target transplant date is May 15 and the packet says six to eight weeks indoors, the sowing window begins roughly eight weeks before the target and ends roughly six weeks before it. Then account for the hardening period according to the crop guidance.
Be careful about what “weeks before transplanting” already includes. Some packet instructions treat the indoor duration as the whole period from sowing through transplant, including the final transition. Others give a separate hardening instruction. Do not subtract the same period twice. When the wording is unclear, ask the seed supplier or a local Extension office rather than inventing precision.
Now add the operational dates: acquire fresh mix and clean containers; test the light and timer; sow; check emergence; thin or separate only as recommended; pot up if the crop and schedule require it; begin hardening; and inspect the outdoor bed. The result is a working sequence rather than a single “start seeds” reminder.
Let light and space veto an early date
Starting earlier does not create an earlier harvest when the indoor environment cannot support the extra time. University of Minnesota Extension notes that artificial lighting is usually needed for strong indoor seedling growth and that windowsills are often too cool at night and too warm or poorly lit during the day. Weak light combined with excess time can produce stretched, fragile plants. Public gardening discussions repeat the same practical problem every spring: an exciting early sowing becomes a shelf of oversized seedlings long before outdoor conditions cooperate.
Before assigning dates, map the usable growing area at leaf height. Our grow-light coverage field guide shows how to record center and edge readings, mounting height, and timer hours. Count only the area with suitable light for the intended crop. A fixture's advertised coverage is not a substitute for measurements at the bench.
Build a tray occupancy line under the crop rows. For each week, total the trays, cell packs, and larger pots expected under the lights. If demand exceeds measured coverage, choose among three honest fixes: sow fewer plants, stagger batches, or start later within the approved range. Buying another fixture is a separate energy, heat, safety, and space decision, not the automatic answer.
| Calendar check | Record | Decision it supports |
|---|---|---|
| Climate | Station, normal period, average last freeze | Local planning anchor |
| Crop | Packet transplant and indoor timing | Sowing window |
| Light | Usable measured area at leaf height | Maximum indoor footprint |
| Containers | Cells, expected pot-ups, final indoor spacing | Weekly shelf demand |
| Transition | Hardening guidance and protected locations | Outdoor acclimation plan |
| Weather | Forecast and local advisories near planting | Proceed, protect, or delay |
Plan water and containers as part of the calendar
A sowing date creates maintenance work. The number of containers, their volume, the mix, airflow, plant size, and room conditions all affect how often they need inspection. Do not convert the calendar into an automatic watering schedule. Check moisture and seedling condition. Our bottom-watering tray guide explains how to calibrate reservoir volume and soak time, compare center and edge cells, and drain the tray after watering.
If a crop will be potted up, add the container change to both the materials list and occupancy line. Estimate the actual media need using inside dimensions with the container volume worksheet. A seedling that moves from a cell to a four-inch pot can use much more shelf area and media than the first-week plan suggests.
Sanitation belongs on the calendar too. Clean reusable containers and tools according to current Extension guidance, use a suitable seed-starting medium, and begin with containers that drain. Record disease or damping-off problems rather than compensating by sowing increasingly large backups. A smaller, traceable batch is easier to observe and improve.
Harden seedlings with the forecast open
Indoor-grown leaves and stems need a gradual transition to outdoor light, wind, and temperature. University of Minnesota Extension describes beginning hardening about two weeks before planting: start with limited time in a protected, shaded outdoor location, increase exposure gradually, and bring plants in or protect them when conditions are damaging. Follow the specific crop guidance and do not treat that example as permission to expose tender plants to cold.
Mark both a planned hardening start and a daily weather check. Wind can desiccate a small cell quickly. Full sun can injure leaves accustomed to indoor light. Cold nights can stop growth or damage a tender crop. Water needs also change outdoors, so inspect the medium rather than repeating the indoor routine.
- Confirm the crop has completed its recommended indoor and hardening stages.
- Check the local forecast, not only the climate-normal date.
- Assess soil moisture, temperature, and workability using regional crop guidance.
- Prepare water and any crop-appropriate protection before moving plants.
- Label the variety and record the actual transplant date.
Use two small batches when uncertainty is costly
A single large sowing puts the entire crop on one weather assumption. When packet guidance allows a window, two smaller batches can reduce that risk and reveal how your setup behaves. Sow the second batch one or two weeks after the first while keeping both within the recommended range. Label them clearly. Compare germination, indoor crowding, transplant conditions, and later performance.
This is not a reason to double the number of seedlings without capacity. Split the planned total between batches. The purpose is to spread timing risk and generate a local record. If the first group becomes crowded while the second remains compact, the next year's calendar gains evidence. If the earlier group performs well outdoors, that result is also useful—but it remains one season's observation, not a universal rule.
Record the actual dates and improve next year
At the end of each crop row, leave columns for actual emergence, first true leaves, pot-up, hardening start, transplant, and a short outcome note. Record whether seedlings were compact or stretched, whether roots filled the container, and whether outdoor conditions forced a delay. Separate calendar errors from environment errors: an early sowing, weak edge lighting, excessive warmth, or a late freeze need different corrections.
Update next year's plan from the record while still checking current packet and Extension guidance. Climate normals are updated on a 30-year cycle and seed varieties change. Your shelf, fixture, containers, and garden exposure may change too. Keep the source and year beside every rule so outdated assumptions are easy to find.
Frequently asked questions
Is my USDA hardiness zone my last frost date?
No. The USDA zone is based on average annual extreme minimum winter temperature and is designed around perennial hardiness. Use a nearby NOAA station's average last spring freeze as the climate anchor for spring scheduling, then combine it with crop guidance and current conditions.
How many weeks before the last frost should I start seeds?
Use the packet or an authoritative crop guide. Some crops spend many weeks indoors, some only a few, and some are better direct-sown. Count backward from the crop's appropriate transplant target; do not apply one number to the whole seed box.
What if my seedlings are ready too early?
Do not move tender seedlings out merely because the calendar date arrived. Maintain appropriate light and watering, reduce crowding where possible, and follow crop-specific pot-up guidance. Record the mismatch and schedule that variety later next season.
When do I begin hardening off?
Follow the crop instructions and watch current weather. University of Minnesota Extension describes a gradual transition beginning about two weeks before planting, starting in a protected, shaded location and increasing exposure while avoiding damaging conditions.
Sources checked
- NOAA National Centers for Environmental Information — Climate Atlas, including 1991–2020 Annual Events normals.
- NOAA NCEI — Last Spring Freeze, explaining the 1991–2020 average last-freeze map.
- NOAA NCEI — U.S. Climate Normals, station and location search for 30-year normals.
- USDA Agricultural Research Service — Plant Hardiness Zone Map.
- University of Minnesota Extension — Starting Seeds Indoors.
- University of Minnesota Extension — Lighting for Indoor Plants and Starting Seeds.
- Penn State Extension — Sowing Annual Seeds.
Research reviewed October 30, 2026. Climate normals describe historical averages. Current forecasts, packet instructions, and regional crop guidance should control the final planting decision.